One of the most satisfying tasks for any dedicated home cook is making your own sausage.
You’ve gotten good at cooking the main meats like brisket, pork butt, and chicken, but the great pitmasters separate themselves with their homemade sausage recipes.
While your local grocer may have their fair share of fresh sausages on the shelf, it’s entirely possible to make your own at home.
Sausage making can seem like a daunting task if you’ve never done it before, but it’s not as hard as it initially seems. Investing in the right tools will make the experience that much easier.
We will take you through the sausage-making process from top to bottom, let you know what equipment you need, and cover step-by-step instructions so you can make your own sausage at home.
Let’s dig in!
What you will need
There are a few necessary supplies you’ll need to start making sausages. Having these in place will ensure you’ll be set up for success and come away with a great end result.
Let’s take a look:
A meat grinder
One of the most important parts of sausage-making (aside from fresh ingredients) is a quality meat grinder.
Meat grinders are pretty simple in terms of operating and can be electric or manually driven. Let’s go over the benefits of both.
Electric meat grinders
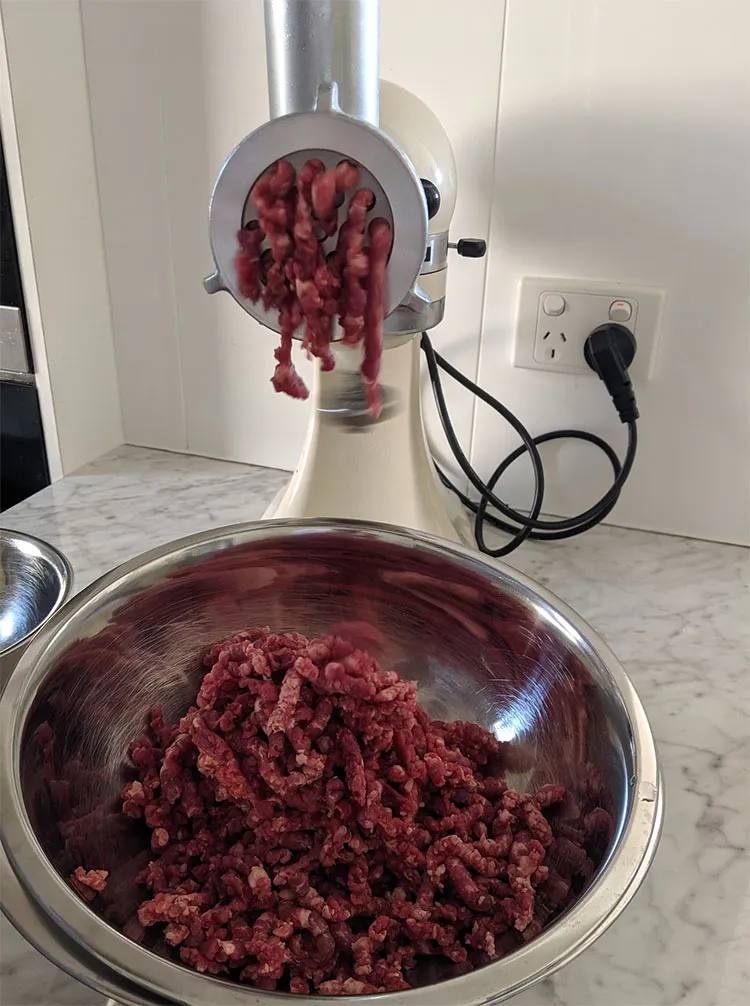
Electric meat grinders are faster than their manual counterparts. They put out more sausage in less time and come in varying levels of power.
You can go for a stand-alone grinder, or various mixers sell grinder attachments.
Manual meat grinders

Manual meat grinders are hand-cranked and definitely slower than electric grinders, but the benefit comes in the way of control. You can control the speed at which meat is ground and how fast it comes out of the grind-plate.
They allow for more of a “feel” and give larger room for error in adjusting the output meat volume. Plus, they’re a simpler machine with fewer parts that need to be replaced over time.
Casings
The type of sausage you’re making will dictate what type of casing you need. Casings come in different shapes and sizes, natural and artificial, and have different purposes based on a recipe. Let’s explore the variations.
Natural casings
If you’ve eaten a bratwurst before then you’ve had a sausage enclosed in a natural casing. Though it may sound off-putting, the fact is natural casings come from the intestines of other animals – most notably from hogs. Other common natural casings come from beef and sheep.
- Natural hog casings are the most commonly used natural casing in the market today. They range in size from 29mm (the size of a bratwurst) to 45mm (the size of a large Polish sausage).
- Beef casings range in size from 38mm up to 5 inches in diameter and are used in to make salami, bologna, and mortadella.
- Sheep casings are naturally smaller, coming in at 19mm to 26mm. “Hot dog quality ” sheep casings have no holes and are used when the meat is emulsified – such as hotdogs. All other sheep casings are used for link sausages like the snack sticks you see at the grocery or convenience stores.
All-natural casings come packed in salt in vacuum-sealed containers for preservation. If you’re not going to use the whole package, the remaining casings can be repacked in salt and stored in a refrigerator for up to two years.
Do not freeze natural casings. This will make them brittle and more apt to bust or crack when filled.
Artificial casings
Artificial casings are made of collagen, cellulose, or sometimes plastic. They are relatively cheap in comparison to natural casings, and easier to manipulate onto the machinery without worry of rips or tears. Some also come pre-tubed for convenience when sliding onto the stuffer.
We’ve broken down the differences between artificial casings to help you decide which one is best for your recipe.
Collagen casings
Collagen casings are derived from the collagen in beef skins and pig hides and are made by processing the collagen through an extrusion device at the desired diameter.
Sausage production costs via collagen is significantly lower than natural casings because of higher production speeds and lower cost of labor.
Edible collagen casings are used for a myriad of sausages from breakfast links to snack sticks. They are extremely uniform in thickness thanks to the extrusion process, very durable during stuffing, and take on smoke flavor easily.
Be sure to check if the casing is edible or not, as some collagen casings are not suitable to eat. Those are used for larger sausages such as bolognas and summer sausages.
Cellulose casings
Cellulose casings are very consistent in diameter and are highly elastic making stuffing sausages fast and easy as you won’t need to worry about them breaking. These casings are generally peeled off after cooking.
Highly permeable to smoke and water vapor, cellulose casings are great for use with franks, hotdogs, and summer sausage depending on the diameter. Just be you don’t eat the casing itself.
Plastic casings
Plastic casings are not edible and are not permeable to smoke or water. These casings are generally used for non-smoked products with high-yield such as bologna or emulsified meats.
Some plastic casings are smoke-flavored for users who still want a hint of smoke in their sausages. They are very user-friendly in the fact that they won’t burst like natural casings when being stuffed and do not require any prep before use.
Spices
Anyone can throw meat into a grinder and stuff a casing, but the spice blends are where great sausages are set apart. The mixture of spices blended with the meat will not only add flavor to the sausage but can change the sausage altogether.
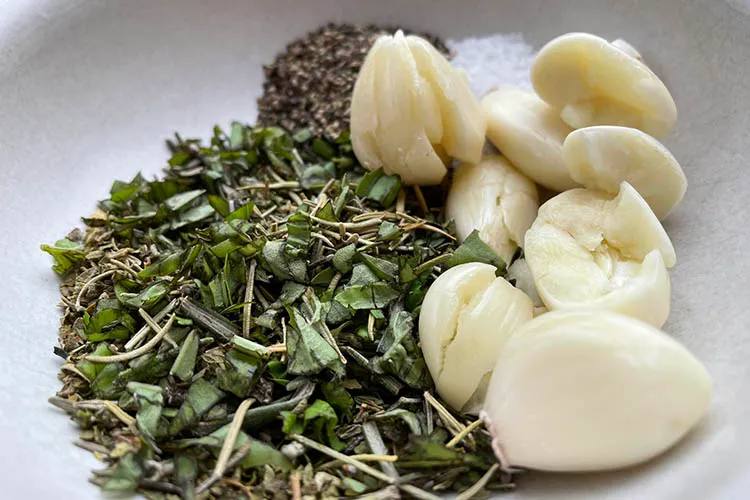
For example, chorizo and salami are both pork sausage products, but chorizo turns red from ancho chili powder that is added to the spice blend.
The spice mixtures will differentiate the sausages more so than any other aspect of the process. This is where you will get subtle nuances of flavors in specific sausages like hot Italian sausage vs. breakfast sausage.
Once you get comfortable with base recipes, play with your spices. Try different mixes and ratios based on your tastes and preferences.
Cure
If you’re going to cook fresh sausages, you don’t need to use a cure. Cure is typically added to any sausage that is smoked and not cooked.
Cure has many benefits when added to meat, but mainly it’s used to prevent the growth of the bacteria that cause botulism. The cure keeps your sausage safe and free from bacteria while slow smoking. Cure also imparts a characteristic flavor and color to the meat, turning it a deep shade of pink.
Cure come in many names, such as Cure #1, Prague Powder #1, and Pink Cure. Learn more about the different types of cures in our guide to cold-smoking meat.
Just be sure to follow the directions in regards to how much to use per pound of meat. Typically, one tsp of cure is good for 5 pounds of meat mixture.
Stuffer
Once you’ve ground up your meat with the spices, you’ll need a way to stuff the mixture into the casings. Since you already have a meat grinder, you can get a stuffer attachment.
Instead of the grinder plate, a sausage funnel is attached to the grinder, and the casing of your choice slides over the open mouth of the funnel. Put the meat and spice mixture back through the grinder and it stuffs the casing through the funnel end.
Not all grinders are great at stuffing sausages, however. You don’t have exact control of the speed at which the mixture comes out. This can end up with ripped casings due to overstuffing.
If you want more control or want to increase the volume of sausage output, you’ll want to get a dedicated sausage stuffer.
Dedicated sausage stuffers hold large amounts of meat with hoppers usually starting at the 5lb size. They stuff sausage much more quickly and efficiently than meat grinders because this is their sole purpose.
Both options work well enough, but if you plan to make a lot of sausages, the stuffer will make your life much easier.
Smoker
When smoking sausage, you want to start at low temperatures and gradually work your way up. This is to prevent all the fat inside the grind from rendering and separating from the meat mixture and either dripping out or to the bottom of the casing. This will make your sausage dry and crumbly.
This amount of temperature control generally calls for an electric smoker. Electric smokers still burn some sort of wood be it chips or pellets but have thermostats that let set low, stable temperatures that can’t be achieved on a charcoal smoker.
You can also cold smoke sausages. Meat takes on smoke flavor more efficiently when it is raw, so cold smoking sausages will impart a heartier smoke flavor.
Cold smoking is not without its risks. Because the temperature isn’t high enough to kill harmful bacteria, you need to take extra precautions.
Hang your sausage in whatever cooking chamber you’re using and let a cold smoke generator fill the chamber up with smoke.
If you’re using your BBQ cooker, you’ll want to open the dampers to let air flow through and keep the smoke clean. Otherwise, you’ll have stagnant, acrid flavor added to your sausage.
Sausage making kits
As you’ve seen there’s a lot of items required to make sausage. If you’re just getting started with this hobby, consider picking up a sausage kit.
These kits include most of the items you need to get started, including the seasoning with cure, casings, and string.
How to make Sausage: Step-by-Step instructions
Now that you are familiar with sausage-making necessities, let’s get into the nitty-gritty of the process and make some sausage!
If you want to see each step in video form, this is a good overview to follow.https://youtube.com/embed/aS2_tuua-7c?feature=oembed&enablejsapi=1&origin=https://www.smokedbbqsource.com
Step 1: Gather your equipment and ingredients
You’ll need the following to make a basic sausage:
- Meat grinder, removable parts placed in a freezer to keep cold
- Sausage stuffer or stuffer attachment
- Large mixing bowls, preferably stainless steel
- Natural hog casings, soaked in warm water to desalinate
- 2lbs pork butt, cut into 1inch cubes and pre-frozen for 30 minutes
- 2 teaspoons ground sage
- 1 ½ teaspoon kosher salt
- 1 ½ teaspoon fresh ground peppercorns
- 4 fresh garlic cloves
- ½ teaspoon cayenne pepper (or paprika if you want a milder heat)
- ½ teaspoon brown sugar
Step 2: Prepare the meat and grinder
Put a little ice into a large mixing bowl, and then place another bowl inside of that. Mix the par frozen meat cubes in with the spices and garlic cloves and thoroughly mix by hand.
It is important to keep things as cold as possible to keep the grinder working efficiently as well as to keep the fat from rendering out of the meat.
Assemble your grinder. Pull the parts of the grinder out of the freezer and assemble on a sturdy countertop. You will be grinding the meat through two different plates – a larger “first grind” plate, and a finer “second grind” plate.
For the first grind, you’ll want a 1/4in to 3/8in plate. This size is large enough to keep the meat flowing smoothly through the grinder without clogging.
Step 3: Grind the meat
Place an empty bowl into another filled with ice at the output end of the grinder. Slowly but steadily push the mix mixture through the hopper and grind into the empty bowl.
Once all the meat is ground up, place it back into the freezer for 15 minutes to keep cold. Then switch out your large grinder plate for the smaller one, usually sized at 1/8in to 3/16in.
Once the smaller grind plate is attached, run your meat mixture through one more time. Your meat should be emulsifying into a paste or paté-like texture.
If the meat starts to get greasy, it’s getting too warm and the fat is breaking down, so place it back into the freezer along with the grinder parts.
Let everything chill for 30-60 minutes and then resume grinding. This will prevent your end product from being crumbly.
Step 4: Mix the ground meat
When making sausages, a lot of recipes skip this step, but it is crucial for the bind of the meat that you thoroughly blend the ground-up mixture. This ensures the proteins and fats bind together and emulsify.
This bond carries through the cooking process making sure the sausage is one piece and not dry and crumbly inside the casing.
Generally, mixing and kneading the ground meat by hand is good enough, but you can also use the paddle attachment of a stand mixer. You’ll know when you’re done when the meat is tacky and pate-like.
To test this, roll the mixture into the size of a meatball and press it into your palm. If the meat sticks to your hand when you turn it upside down, you are done mixing.
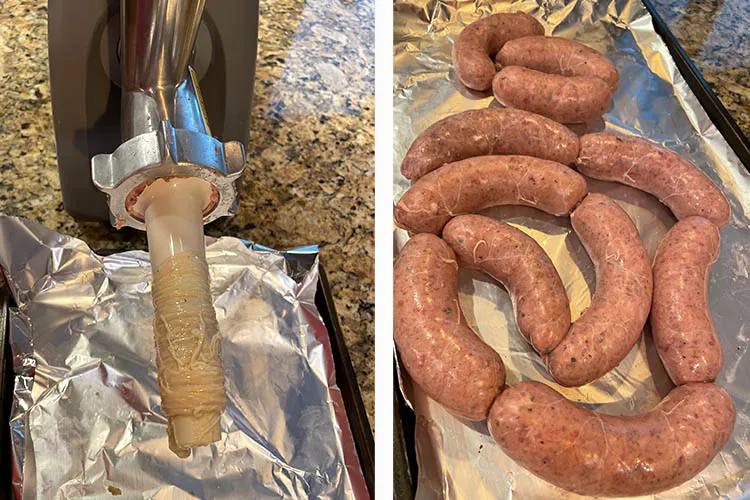
Step 5: Stuff the casings
With your meat mixture done, get your stuffer or stuffer attachment ready. Pull the casing from the warm water and feed it onto the stuffing funnel, tying the end. You’ll want to keep both the funnel and the casing moist throughout the process so as to prevent rips or burst casings.
Poke a small hole at the end of the casing with a knife or a sausage pricker to let air escape and then slowly feed the mixture through the stuffer and into the casing, taking care not to overstuff or break the casing. If you see any pockets of air, just prick a small hole to let it out.
Once all the meat is stuffed into casings, cut and tie the end. You can keep the sausage in one big loop like this, or you can twist it into links at your desired length.
Step 6: Dry the sausage
You could cook the sausage at this point, but it’s best to let it rest and dry out in the refrigerator for a few hours, preferably overnight. This will let the flavors meld together as well as dry out the casing so the moisture doesn’t steam the meat while cooking.
This is more important if you’re curing and smoking sausages. Drying out the casings allows for smoke to adhere better to the sausage and permeate into the meat.
It’s not necessary if you’re going to cook fresh sausage right away, but the end result will be much better if you let the sausage rest and the casings to dry out.
Step 7: Cook the sausage
Almost there! Since these are considered “fresh” sausages with no cure, you want to cook them at appropriate temperatures. Pork sausage needs to hit an internal temperature of 150°F to be safe.
The method, however, is up to you. Below you can find ways of cooking that produce excellent sausages:
- Poach first then grill over medium or indirect heat
- Hot Smoke at 250°F – 300°F until internal temp reaches 150°F
- Pan fry with a braising liquid like beer
Step 8: Eat and enjoy!
You’ve done it! You’ve learned and endured through your first sausage making journey, and now you get to reap the rewards!
This recipe is a base foundation for a good pork sausage, but once you get comfortable, feel free to experiment with different spices and cooking methods to see what you can come up with.
Best sausage making recipes
There is a whole world of different sausage varieties out there, making it rather hard to know where to start.
You really can’t go wrong, but if you’re struggling here are a few of the best types of sausage to try making at home.
- Italian sausage (recipe at bottom of the post)
- Kielbasa
- Andouille
- Chorizo
- Breakfast sausage
- Irish Bangers
To wrap it up
Sausage is a versatile food borne out of the necessity for food preservation. There are so many unique sausages in the world and the techniques for each are similar but nuanced.
We’ve only explored the tip of the iceberg when it comes to sausage-making, but like anything in BBQ the more you experiment and wrap your head around it, the more creative and adept you become.
We’ve only covered the tip of the iceberg when it comes to home sausage making.
I suggest picking up some books if you really want to dig into the topic in more detail.