Offset barrel smoker. Stick burner. Horizontal smoker.
Whatever you call them, this is the type of smoker that dominates the competition circuit. And there’s no doubt this is what most people picture when they think of a smoker.
Unlike electric, gas or even charcoal smokers, there’s a lot more you need to know before you can start churning out your own delicious barbecue.
Read on for step by step guide to using your offset smoker. From firing it up to tips for fire management and more.
How Offset Smokers Work
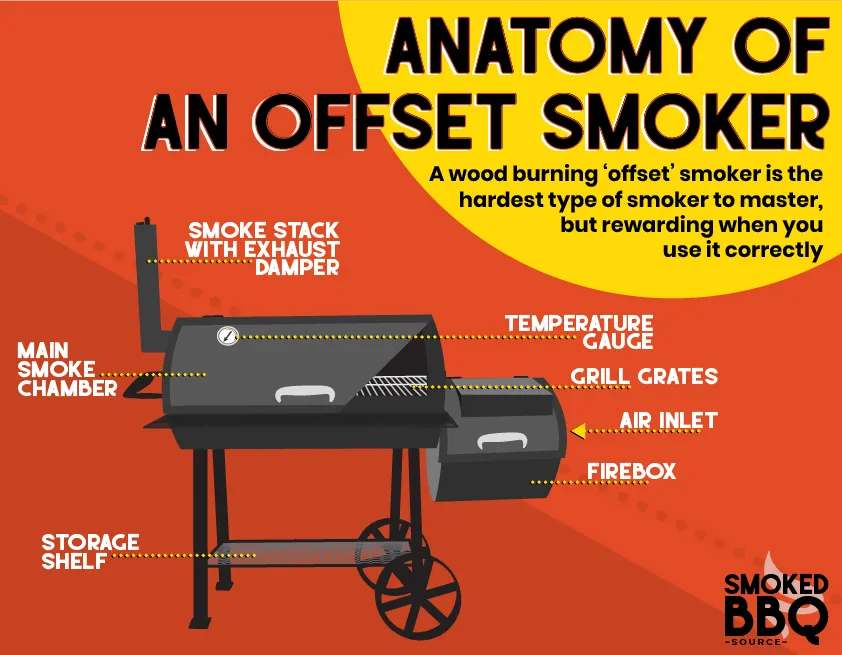
Offset smokers consist of a large chamber which looks like a oil drum or a metal box. This is where you place the food you want to cook.
The fire is built in a smaller chamber which usually sits off to the side of the main chamber, sitting down a little. Sometimes it is even positioned at the back of the main cooking chamber.

Heat and smoke from the fire box travels into the main cooking chamber to cook and flavor the food.
A chimney comes out of the cooking chamber, usually at the end furthest away from the fire box.
To control the temperature, there is a vent on the side of the fire box, and the chimney can also be opened and closed.
If you’re ready this guide I assume you’ve already purchased one, but if you’re still researching then this post has some good info on factors to consider before buying an offset smoker.
Step By Step Guide to Using an Offset Smoker
Using an offset smoker is not a set-and-forget proposition. Of all the smoker types out there, this one requires the most knowledge and work.
But don’t let that put you off. We have broken down how to use one of these smokers into simple, easy to follow steps.
There are also plenty of great resources on YouTube you can access which run you through the process as well. We have found this video from “All Things BBQ” particularly helpful.
Starting the Fire
- This might be a surprise, but the best way to fire up your offset smoker is with charcoal. Once you have enough heat in the coals, then you add the wood.
- Assuming you don’t have any fancy gas ignition systems on your offset smoker, the best way to light your coals is with a chimney starter.
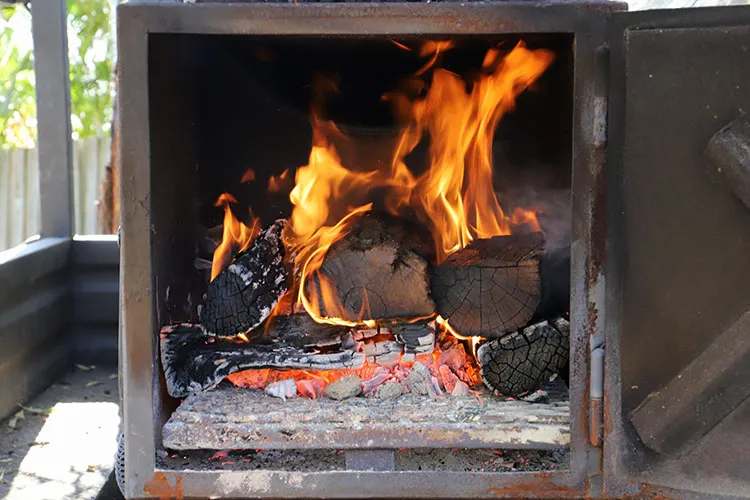
- Once your coals are lit, dump them out of the chimney smoker into the firebox. It is a good idea to dump them on the far side of the firebox so you don’t have to keep reaching over the fire when tending to it.
- Place a couple of pieces of the wood you plan to smoke in the firebox. Don’t sit them directly on top of your coals just yet. For now, we are just heating the logs. The ideal log size is about the diameter of a soft drink can.
- Once the logs are heated and dried out, place them on top of your coals. Now we are waiting for the fire to come up to temperature.
- While you wait for this to happen, place another log in the firebox to warm up. Every time you roll a new log on the fire, place another in the firebox to heat up. These heated logs will catch fire much quicker and won’t produce white smoke, helping your cook run nice and smoothly.

Make sure you keep the vents fully open and the firebox door cracked open while you wait for the cooking chamber to come up to temperature.
Getting the Temperature Right
Unless you have already calibrated your smoker and know the built in thermometer is reliable (unlikely), a good smoker thermometer is vital.
Make sure you have a probe set up at the grate level, right where your meat will be cooking.
- Once you have reached the desired temperature, position the vents on the side of the firebox to about ⅓ open, and adjust the chimney cap to be ½ open.
- You will need to check the temperature and adjust the vents throughout the cook, as factors such as the wood, the temperature outside and the wind can affect the temperature.
- At this point, you should check in on the fire again. If your log has turned to coals, roll in the log that you had heating up, and place another log in to heat up.
- Resist the urge to make huge adjustments to your vents in one go. It is best to make fine adjustments gradually to reign your temperature in.
Fire Management
Fire management in an offset smoker takes experience. It’s important to learn the quirks of your specific smoker.
And don’t forget that the weather can dramatically effect everything.
This video from T-ROY Cooks contains a lot of practical tips. If you don’t have 20 minutes to watch the whole thing, the main points are summarized below.
- Although it will differ from smoker to smoker, you should be checking the fire pit roughly every 45 min to an hour to put on new logs.
- You should also check the temperature and the smoke coming out of the chimney (without opening the fire pit door) every 15 or 20 mins to catch any problems early. If white smoke is pouring out of the chimney you might have some problems in the firebox.
- If the temperature starts to drop, this is a sign that you should put some more wood on the fire.
- If your temperature has dropped, and you add on a new log, you might need to leave the firebox door open just a crack for a couple of minutes to help get the temperature back up.
- There can be a difference of up to 75°F from one end to the other of the cooking chamber. Make sure you rotate your meat too so that it does not cook unevenly.
Tips For Cooking With an Offset Smoker
Cook With Charcoal + Wood
To get the best out of an offset smoker, cooking with charcoal and wood in combination is the winning formula.
Cooking with wood alone is fiddly and can lead to bitter, creosote covered food.
Cook with charcoal only and you miss out on the flavor the wood can add.
Start your fire off with fully lit coals which you started in a chimney, adding to wood to them to keep the fire rolling.
Preheat the Cooker Before Adding Your Meat
To avoid creosote on your food, wait until the cooking chamber is at the right temperature before you add your food.

This type of smoker can give off way more smoke in the early stages than a charcoal smoker, and it’s definitely not the type of smoke you want to flavor your food.
Use a Digital Thermometers at Both Ends
As we mentioned earlier, the temperature can be up to 75°F different from one end to the other of the cooking chamber.
As this is the case, you need a thermometer at both ends. You can add these yourself by drilling a hole in either end, then inserting the thermometer probes.
Keep the lid closed as much as possible
Try not to keep opening the doors! This applies not only to the cooking chamber but also to the fire box.
It is true, you will need to open the doors periodically to add wood or check on the meat, but monitor as much as you can from the thermometer reading, or by observing the smoke coming out of the chimney to avoid needless door opening.
Rotate the Meat
We have touched on this briefly, but due to the temperature difference from one side of the cooking chamber to the other, you will need to rotate the meat if you are cooking at both ends of your grill.
Even if you are only cooking one piece, make sure you turn it around – otherwise you could be serving an unevenly cooked dinner.
Learn One Vent at a Time
We did give some suggestions for vent positions in the step by step instructions in this article, but if you want some more information about managing the vents, here are some tips:
- The first vent you need to turn your attention to is the one on the fire box. This has the most direct impact on the temperature of the fire, and therefore the cooking chamber.
- While you are getting the fire going, leave this vent wide open. Once you are getting closer to your desired temperature you can start to close this one up a little.
- Get the temperature stable using this vent while the chimney is still wide open. Once the temperature is stable and has been for almost 30 mins, then you can start adjusting the chimney.
- As a rule, don’t shut the chimney more than half. And don’t shut the firebox vent all the way, or you will end up with bitter, creosote covered food.
Go Easy on the Smoke
Smoking meat is definitely a case of “less is more”
While you will be getting smoke flavor if you are using wood and charcoal in combination, you can also set up your fire using charcoal only, and then use pellets, chips or chunks for your smoke flavor, like you would on a gas or charcoal barbecue.
If you decide to go down this path, don’t soak the chips, chucks or pellets, and add them every 10 mins or so, around 4 ounces at a time once the temperature has reached 200°F.
Beware of the Weather
The weather outside is going to affect the temperature inside your smoker. Take the weather into consideration, and make sure you have enough charcoal and wood to make up the difference, especially if it is very wet, windy or cold.
Use a Water Pan
The addition of a water pan will help regulate the temperature, add moisture, and improve the flavor of your meat.
To add a water pan, a good suggestion is to add a rack above the fire in the fire pit, and place a tray full of water on the top of the rack.
Do Some Practice Runs
Learn to calibrate your offset smoker with a couple of dry runs. If this feels like too much of a waste of good wood and charcoal, then you can try cooking cheap cuts on your practice runs.
Don’t get too disheartened if the results of the practice runs aren’t amazing. Remember the point of practice runs is to learn how your smoker works, and figure out some tips and tricks of your own.
Wrapping it up
If you have just unboxed an offset smoker, or you are thinking of getting one, you now have all the knowledge you need to light ‘er up and start smoking.
Remember that your best friend to get your offset smoker started is a charcoal chimney. Wait till the coals are red hot, get your cooking chamber up to temperature, add your food, then monitor and maintain that temperature…
And don’t open the lid without a good reason – no place for sticky beaks!
You will need to tend to an offset smoker more than a pellet smoker, but for the old school smoking fans out there, that is part of the whole experience.